

This Content Is Only For Subscribers
Cold snaps in Texas aren’t polite. One day it’s patio weather; the next, wind knifes through door gaps, pipes seize, and your phone lights up. The difference between an inconvenience and an insurance claim is often what you had on site at 10 p.m. A good winter emergency kit turns chaos into a checklist. Here’s how to build one that fits Texas conditions, your property type, and your budget—and how to stage, label, and deploy it so your team can act in minutes, not hours.
Why a winter kit matters (especially here)
Long winters demand endurance. Ours demand speed. Texas cold fronts arrive hard and leave fast. Damage usually happens at two moments: when the freeze hits (no-heat calls, iced stairs) and when it thaws (bursts, leaks, roof drains). A winter kit is less a tub of gear and more a playbook-in-a-box—tools, materials, instructions, and contacts in one place so nobody is improvising with duct tape and hope.
Design principles: make it useful at 2 a.m.
- Solve the first hour. Your kit should stabilize a leak, power a light, de-ice a walkway, and document the scene before vendors arrive.
- Pack by mission, not category. “Stop a leak” bundle beats a random pile of parts.
- Label like you’re tired. Big fonts, color coding, simple words.
- Standardize across properties. Same layout, same labels, same shelf spot.
- Rebuild after every event. Inventory is part of the close-out.
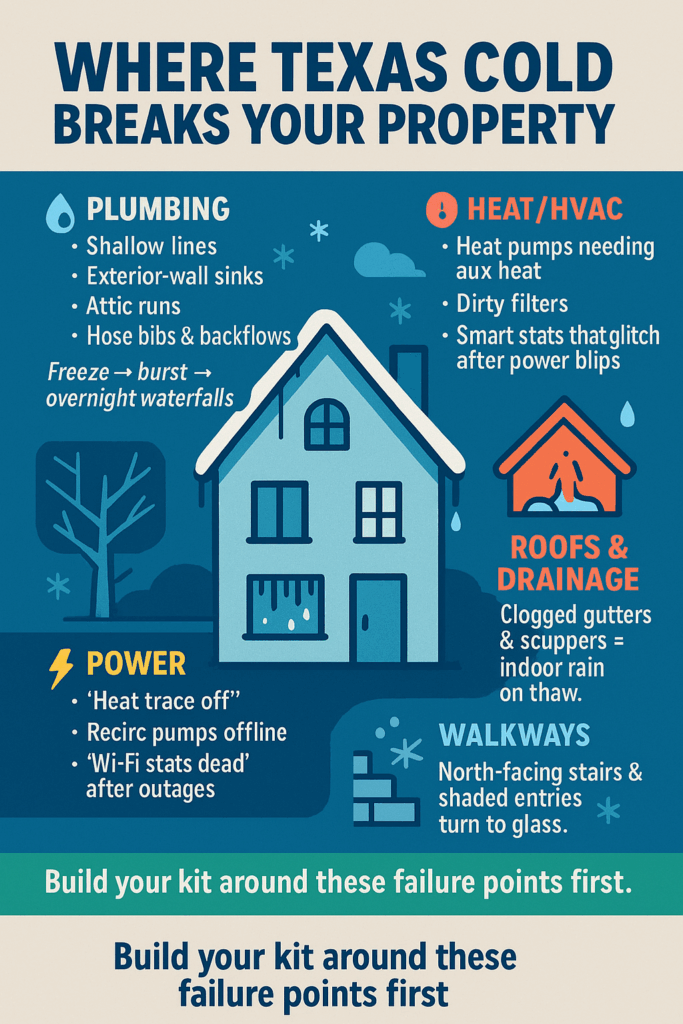
The Texas risk map (build around this)
- Plumbing: shallow lines, exterior-wall sinks, attic runs, hose bibs, irrigation backflows, water heater pans without drains.
- Heat/HVAC: heat pumps that need aux heat, dirty filters, smart thermostats that reset after power blips.
- Power: brief outages that kill heat trace, recirc pumps, and Wi-Fi thermostats.
- Roofs/drainage: debris in gutters and flat-roof scuppers; fast melt-water with nowhere to go.
- Walkways: north-facing stairs and shaded entries that glaze overnight.
Your kit should let you act on those problems first.
What to include: the core kit (multi-family or SFH portfolio)
Think of this as the “trunk” your on-call tech can grab and make a bad night okay.
1) Leak stop & water control
- Assorted pipe insulation sleeves (½”, ¾”, 1″) + foil tape and zip ties
- UL-listed heat tape (for known problem runs; not for ad-hoc installs)
- Faucet/hose-bib covers (extras)
- Two universal supply lines (toilet/sink), ⅜” compression angle stops, Teflon tape
- Sharkbite-style push fittings (couplings, caps) for common copper/PEX sizes
- Water key for curb stops and a small meter wrench
- Wet/dry vac with extra bags and a squeegee
- Absorbent pads, contractor bags, microfiber towels
- Moisture meter and IR thermometer (document conditions)
2) Heat & air
- Tip-over-protected space heaters (loaners for occupied units during repairs)
- Two spare thermostats (simple battery units) + batteries
- Common filter sizes (one per unit in a small property; a cross-section in larger sites)
- Condensate line cleaning kit: tablets, brush, clear sight tee
- GFCI tester and spare GFCI outlets (kitchen/bath)
3) Power & light
- Heavy-duty extension cords (rated, grounded) for supervised, temporary use
- Headlamps and flashlights (with fresh batteries)
- Spare breakers for common panels (if your electrician allows this in SOPs)
- Power strip with surge protection for office gear
4) Ice & exterior safety
- Pet-safe deicer and hand spreaders
- Caution cones, a few folding wet floor signs
- Snow/ice shovel, stiff broom, and leaf rake (for roof drains/gutters)
- Nitrile-coated gloves, safety glasses, shoe traction slip-ons
5) Roof, gutter, drainage
- Downspout extenders and splash blocks
- Multi-tool, nut drivers, roofing mastic tube (for emergency temporary patches—then call your roofer)
- Tarps and plastic sheeting with painter’s tape and spring clamps
6) Communication & documentation
- Laminated shutoff maps (domestic main, risers, unit valves)
- Property risk map (cold walls, attic chases, known weak points)
- Printed vendor SLAs and after-hours numbers (plumber, mitigation, HVAC, electrician, roofer)
- Preprinted door tags and notice templates
- A clipboard with incident forms and a Sharpie; QR code to digital log
- Phone mount and checklist cards for on-scene photos
7) PPE & miscellany
- N95 masks, nitrile gloves, Tyvek suits for dirty work
- First-aid basics and eyewash bottle
- Knee pads, utility knives, pry bar, bit set, compact drill/driver
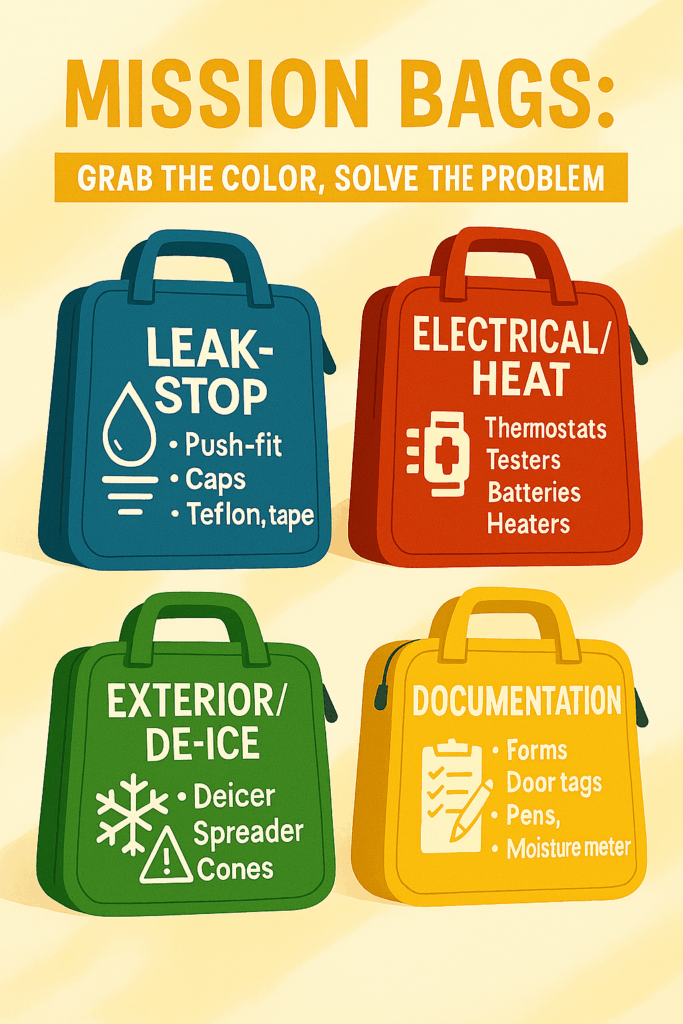
Build “mission bags” inside the kit
Don’t make people hunt. Use colored pouches or small crates:
- Blue: Leak-Stop (push-fits, caps, angle stops, supply lines, Teflon, towels)
- Red: Electrical/Heat (thermostats, testers, batteries, heaters)
- Green: Exterior/De-ice (deicer, spreader, cones)
- Yellow: Documentation (forms, door tags, pens, tape measure, moisture meter)
Label each bag with what it’s for and a 4-line how-to. At 1 a.m., brevity wins.
Where to stage kits (and how many)
- Small multi-family (≤24 units): one master kit in the maintenance room + a smaller “go bag” in the office.
- Garden communities (25–150 units): master kit + a satellite bin near each building cluster (locked), plus a truck kit.
- Scattered SFHs: one master kit in the shop + a truck kit for the on-call tech.
- High-rise/mid-rise: master kit on the main floor with secondary caches near mechanical rooms and rooftop access; separate mitigation cache (wet vacs, fans) ready to roll.
Always place the kit next to the main shutoff map and post the on-call number above it.
Labeling that works
- Shelf tag: “WINTER KIT—GRAB THIS FIRST” (4″ letters).
- Inventory sheet laminated on the lid with quantities and “reorder when ≤ X.”
- QR code to a Google Sheet or portal page with vendor contacts, SLAs, and the incident log.
- Color tape on handles to match mission bags (blue, red, green, yellow).
Staff training: two short drills
- Freeze drill (15 min).
- Scenario: “Unit 204 no water at kitchen; heat on 65°F.”
- Actions: grab Blue bag, verify other fixtures, warm the cabinet area (door open, space heater monitored), stand by with plumber on text, slow repressurize after thaw.
- Goal: classify suspected freeze vs. active leak and avoid bursting during thaw.
- Burst drill (20 min).
- Scenario: “Water coming through 104 ceiling.”
- Actions: shut the smallest zone, protect below units, wet vac, open baseboards (2″ vent gap), document moisture, call plumber + mitigation in parallel.
- Goal: stop spread in 10 minutes; generate complete documentation.
Time both drills. Speed is a habit.
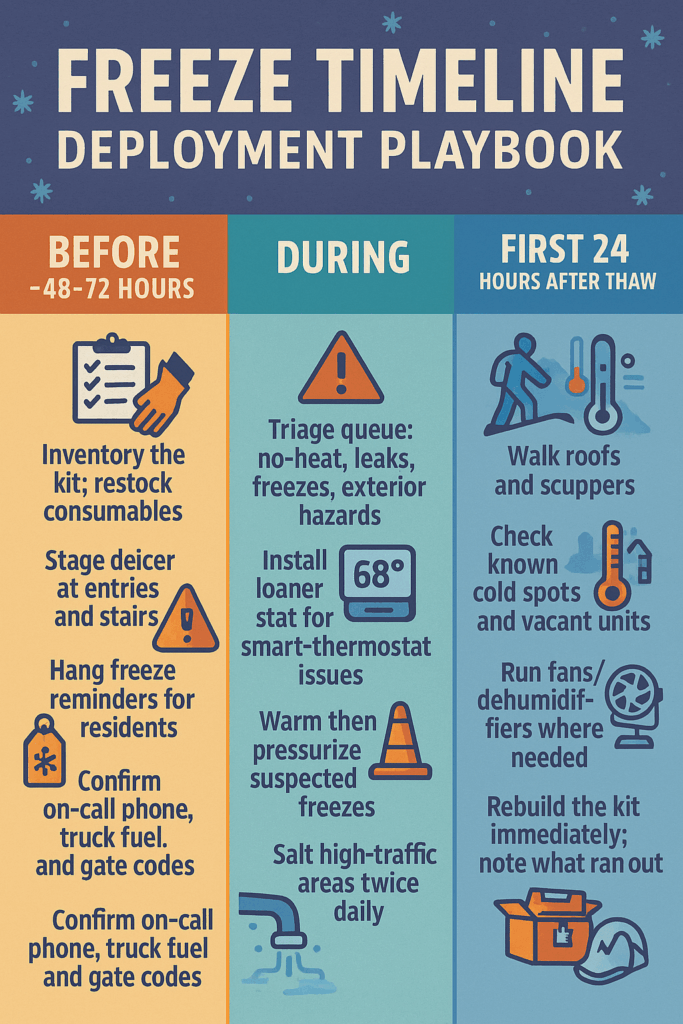
The deployment playbook (before, during, after)
48–72 hours before a freeze
- Inventory the kit; restock consumables.
- Stage deicer at entries and stairs.
- Hang freeze reminders for residents (heat 68–70°, open under-sink doors on exterior walls, drip cold water, report no heat immediately).
- Confirm on-call phone, truck fuel, and gate codes.
During the event
- Triage queue: 1) no-heat, 2) active leaks, 3) suspected freezes, 4) exterior hazards.
- For no-heat with heat pumps, verify aux heat; install a loaner stat if the smart stat is flaky.
- For suspected freezes, warm + wait with eyes on lines; don’t re-pressurize blindly.
- For active leaks, shut off the smallest zone, start extraction, tag wet areas with tape, meter and log.
- Salt high-traffic areas twice daily.
First 24 hours after the thaw
- Walk roofs and scuppers.
- Check known cold spots: north walls, attic chases, vacant units.
- Swap any soaked insulation, run fans/dehumidifiers where needed, meter again at 24/48 hours.
- Rebuild the kit immediately; note what ran out.
Budget tiers: good, better, best
- Good (lean ops): $400–$700 total—focus on leak stop, deicer, basic lighting, and documentation.
- Better (most properties): $1,200–$1,800—add wet vacs, loaner thermostats, moisture meter, more fittings.
- Best (large sites): $3,000+—multiple wet vacs, air movers/dehumidifiers, secondary caches, spare circulator pump and heat-trace controls (if applicable).
Start with good and upgrade what you actually used after the first event.
Vendor SLAs belong in the kit
Tape a one-page SLA to the inside lid—plumber, mitigation, HVAC, electrician, roofer—with:
- Response times: “Active leak ≤ 2 hours,” “Tarp ≤ 4 hours.”
- Photo-on-arrival requirement and authority limits (e.g., “stabilize up to $1,000 without call”).
- Access notes: gate codes, key box locations, parking.
When your tech calls, they read straight from that page. No fishing through emails.
Documentation: make adjusters and CPAs love you
Your kit should produce clean evidence:
- Eight photos minimum: wide area, close problem, shutoff used, meter readings, mitigation setup, and a timestamped shot of the front door/unit number.
- Incident sheet capturing who, what, when, water source, shutoff time, and first contact with vendors.
- Follow-up line linking to the invoice and final dry readings (24/48 hours).
- If the fix is capital (e.g., new water heater), note placed-in-service date for depreciation.
Five minutes of paperwork now is hours saved in April.
Property-type tweaks
Older single-family homes
- More push-fit caps, angle stops, and faucet supply lines.
- Extra weatherstripping and door sweeps—drafts drive freezes.
- Printed shutoff photos for each address (tape inside kitchen cabinet).
Garden apartments
- Larger deicer bins and a spreader plan per stairwell.
- Satellite mini-kits (Blue + Green bags) locked by each building.
- Extra wet vac dedicated to laundry/common areas.
Mid/high-rise
- Riser maps and valve tags are critical; include a lamination pouch and zip ties to replace missing tags on the fly.
- Add elevator protection (plastic, cones) and a shop-vac just for lobbies.
- Quick-deploy containment plastic for corridor ceilings.
Safety rules to print and tape in the kit
- No unattended space heaters. Three-foot clear zone; hard surface only.
- No improvised heat tape installs. Only pre-planned runs on GFCI circuits.
- Cut power to a wet circuit before touching anything electrical.
- Never hang or tape anything to sprinkler piping/heads.
- When in doubt, shut down the smallest water zone and call the plumber.
Quick resident messages (ready to copy)
Freeze Alert (text/email):
Heads-up: A hard freeze is forecast for tonight/tomorrow. Set heat to 68–70°, open under-sink doors on exterior walls, and drip cold water at at-risk faucets. If you lose heat or see water, call/text [number]. Water shutoff photo: [link].
Active Leak Notice (after shutoff):
Water is off to [unit/stack] while we repair a burst line. Plumber ETA [time]. We’re extracting/drying now to prevent damage and will update by [time].
Print these on the kit clipboard and save them in your phone.
After-action: turn emergency into improvement
When the weather calms, walk the building with your incident photos and mark the root causes: under-insulated chase, missing door sweep, unsealed hose-bib penetration, thermostat batteries dead, clogged scupper. Assign a permanent fix with a date. Then add anything you wished you’d had to the kit and restock the day you close the ticket.
A one-page checklist to tape on the lid
Grab: Winter Kit + phone + keys + camera.
Identify: Leak vs. no-heat vs. freeze vs. exterior hazard.
Shutoff: Smallest zone first (fixture → unit → stack).
Stabilize: Towels, wet vac, baseboard vents, cones/signs, deicer.
Call: Plumber + mitigation (parallel), HVAC if no heat.
Document: Photos, moisture readings, times, names.
Notify: Residents (door tag/text), neighbors below.
Restore: Slow repressurization with eyes on lines; confirm heat.
Rebuild: Restock kit; upload photos and incident form; log follow-ups.
The payoff
A winter emergency kit won’t change the weather, but it will change how your property experiences it. When gear, instructions, and contacts live together—and your team rehearses the first ten minutes—frozen pipes become controlled events, not viral videos. Ten dollars of fittings, a handful of photos, a meter reading, and a clear note about what you did and when: that’s the quiet difference between a crisis and a routine repair.
Build the kit once, drill it twice, restock it every time. The next time a blue norther barrels through, you’ll be ready.

